
Wood Carving Tutorial
How to Carve Wood
A word about Safe carving:
When the chips are flying with gouges and mallets, or when using any power tool, wear safety glasses. Your eyes are your most valuable tool; protect them.
If you are using power tools that create dust, be sure to wear a dust mask. Wood can contain toxic fungi, and some woods themselves can be hazardous.
While applying force to push a knife or gouge through wood, tools frequently slip. Always keep your hands behind the tool's sharp edge. Do not hold the wood in your lap while carving. Always try to clamp the work piece on a table, or in a vise so that both hands are free to control the knife, chisel, or power tool - and are behind the sharp edges. Cuts often happen when one hand is trying to hold the piece of wood and the other hand is pushing hard on the knife or chisel towards your hand ... and the tool slips. Secure the work piece, and keep both hands on the tool and behind the sharp edge.
Use common sense. Listen to that little voice of self preservation. Every time, just before I've injured myself, there was a little voice in my head saying "you shouldn't be doing this, it's not safe." Then...Boom! Ignoring that little voice, even for a second, may result in a trip to the first aid kit. Listen to the little voice.
Speaking of first aid, be sure to keep a well-equipped first aid kit handy.
Wood Grain
Wood is composed of longitudinal cells lying roughly parallel to each other and running in a direction from the roots of the tree to the leaf canopy.
The domanent feature of carving wood is dealing with the grain of the wood. Understanding the characteristics of the wood grain and working 'with the grain' makes carving a pleasure. Ignoring it will result in frustration.
The wood grain in a board doesn't always follow the parallel sides of a board. It often angles slightly up or down, or can even take unexpected dips and curves. So when carving, you may have to change the direction the chisel is taking in order to keep the wood from splintering.
When carving you must constintly be conscius to the direction the wood grain is taking.
If the wood starts to tear or splinter, and your chisel is sharp, you are probably going against the grain. Just change directions and get clean cuts again.


Carving with the Grain:
To carve efficiently, your tools must be razor sharp. The chisel should leave a shiny cut through the wood, with no white streaks which indicate a nick in the blade.
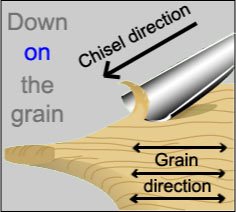
To determine the direction of the grain, look at the long cell fibers. The darker streaks of the annual rings can help indicate the direction of the grain.
Carve down on the grain. Carve in a downward direction onto the parallel lines of grain. If the wood seems to be tearing, and your tools are sharp, then you are probably going in the wrong direction. Turn the chisel around and carve in the opposite direction to get clean cuts again.
You can also carve diagonally across the grain, but if you carve upwards against the grain, it will likely tear and splinter the wood. Cutting diagonally across the grain, at about a 45 degree angel, can help solve the problem of a wavy grain that keeps changing directions and prevent the wood from splintering.
Carving in a straight line parallel with the grain can be disasterous. It can raise up a long splinter of wood that might run under an area of the carving that you wanted to save.
Using a Knife
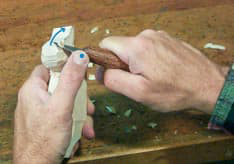
When working on a small carving that can be held in the hand, hold the wood in the left hand (assuming you are right handed) and the knife in the right.
Keep the left hand behind the knife blade and use your thumb, on the blunt side of the blade, to act like a fulcrum to control the cut. With the thumb stationary, rotate your right hand and wrist to make the cut.
With this technique, if the knife should slip, you will not be cut. The knife should never go flying uncontrollably out off the piece of wood. That is a sure way to get cut. The knife should always be under control.
Another technique is to hold the knife as though you were peeling an apple. Just be careful not to nick your thumb.
The basic safty rule is to always keep fingers or other body parts behind the knife blade or chisel in case it accidently slipps out of control. Don't do things like holding the wood in your lap while carving, or holding the wood with your hand in front of the chisel. Secure the work piece so that both hands are free to control the tool.
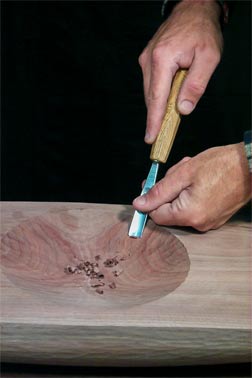
Using Gouges, Two Hands
Hold the chisel handle in the palm of the one hand to push the gouge, hold the metal shaft with the other hand to guide the cut.
Rest the hand holding the metal shaft of the chisel on the wood. This will act like a break so that the tool does not slip out of control when it is pushed forward. This technique keeps fingers safely out of the way, and provides good control of the chisel.
You can use your body weight to help push the tool through the wood. Use a mallot if this doesn't work. Whenever possible, clamp the wood piece down to the table or vise so that it is secure and not sliding around. That way you aren't tempted to hold the piece with the other hand and pushing the chisel towards your hand.

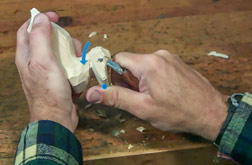
Using Gouges, One Handed
Hold the chisel like you are holding a pencil. Brace the back side of your other fingers against the wood, they will act like a break to keep the chisel under control. With this technique, you can make small detail cuts.
This is where haveing very sharp chisels is important to getting clean shinny cuts. If you want to leave the chisel marks as the final finish, trying to follow the contours of the form as you carve will help give the feeling of fullness to the shapes.
Roughing out
No matter how big or small your carving is, try to remove as much of the scrap wood as possible with a saw, band saw, or chain saw.
The usual process is to cut out the front view profile and the side view profile.
The most common mistake made by beginning carvers is that they are afraid of removing too much wood. You need to get past the square shape of the original block of wood and establish the basic rounded shape of what you want to carve.
Carve out the large shapes on the whole sculpture first. You must establish the big shapes before you can start adding the small shapes, and then the details.
Start with large U-gouges to remove the maximum amount of material. Break the sculpture down into geometric shapes, or establish the major planes of the object.
Work from the large forms to the small details, large gouges to small chisels. If you have not first established the large shapes that define the form, no amount of beautiful detail laid on top will save ill-defined form.
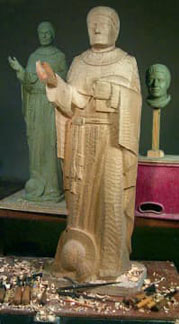
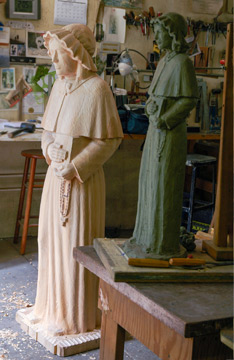
Using a Clay Model
At times it is fun to get a log and just start carving into it and see what comes out. Or you have an idea of what you want to do and just start carving and working it out and creating as you go.
Other times you may have a definite image that you want to carve. In that case, I recommend making a clay model. Work out the forms in clay. You can now see the front, side, and back views. You can work out the areas where you may run into problems during carving. Better to figure those things out in a clay model where you can easily make any changes, rather than when you are half way into the wood carving and have taken off more wood in a spot and wish you could get it back.
I make my maquettes (clay model) at a third or half size to make the enlargment easier to calculate.
A proportional caliper can help with the enlargment. It is adjustible to any ratio needed. Once the correct ratio is set in the tool, it is easy to make the enlargement. Place the small end on the part of the clay model you want to measure, then flip it around to the large end and place it up to the wood carving.
I have found that it is good to check every once in a while with the calipers. Making visual judgements only on proportions when there are still large forms from roughing out, mistakes can be made.

Adding the Details
When working from the large forms down to the smaller shapes, I like to try to keep the whole carving at about the same stage of completion at the end of each day of carving. I avoid having one area almost complete while other areas are are left barely carved.
After the large shapes have been established, you can begin breaking them down into smaller details. Now is the time to put in the details in with the smaller U-gouges, V-gouges, and veiners (small U-gouges) that will define smaller shapes.
At this point, it is important to keep tools razor-sharp if you intend to leave the tool marks as the final texture. Any nicks in the tool's edge will leave white lines in the cut and detract from the final appearance.
If you want to leave chisel marks as the final texture rather than sanding, concentrate on following the contour of the shapes arond, as though the marks are wrapping around the shape. This will help accentuate the feeling of roudness.
If a design calls for undercutting a shape, avoid doing that until the very end. If you do it too soon, and you end up having to cave farther down on the top side and you find that you wished you haden't carve away that material underneath.
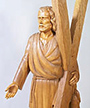
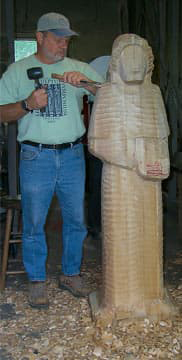
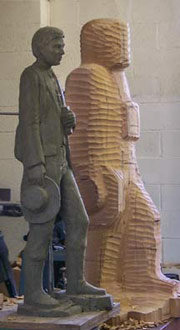
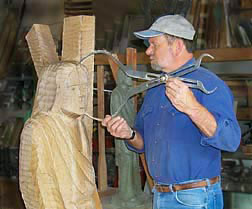
Follow the step-by-step carving
of a life-size figure in wood, from gluing up the block, to
carving with mallet and chisels, and then applying the finish.
Click carving a figure.
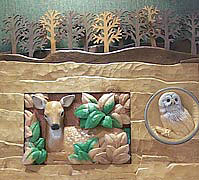
See details of a 5'x12' wall mural carved out of eight different types of wood. The mural depicts scenes of the Eastern Pennsylvania countryside, from wild life scenes on the left side. to Amish and farming scenes on the right.
Click wood carved wall mural.
Types of Wood
Types of wood for carving.
Wood Carving Tools
See some of the tools for carving.
Follow my Facebook Page, The Sculpture Studio LLC to see more photos of sculpture and how it is made.